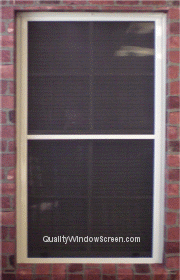
Solar Window Screens normally covers the entire window to attain maximum cooling benefits.
Check the Window for Solar Screen "Tracks"
 What Are Solar Screen Tracks?
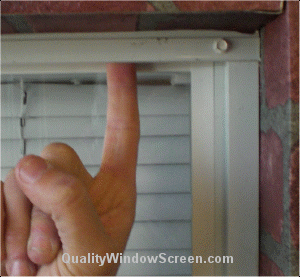
First check for a U-Shaped Channel at the Top of the window frame.
You should find the "Top U-Channel" that may be 3/8" to 1/2" deep.
This is where the top of the screen with Leaf Springs or Tension Springs will slip up into.
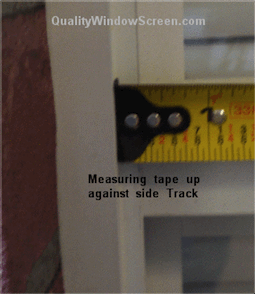
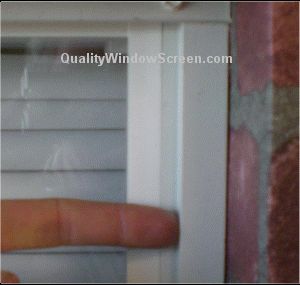 Next check to see that there is a recessed area on both sides of the window running top to bottom for the solar screen to lay in. This is called "Side Tracks".
 Now Check for a Lip at the bottom of the window straight below the top U-Channel.
You should find the "Bottom Lip" may be only 1/16"" to 3/16" deep (Not as deep as the top).
This is what the bottom of the solar screen will slip behind to hold it in place.
STOP: If your windows DO NOT have these characteristics, then there are not "Tracks" for full size solar screens. You should check the How To Guides for other ways to attach solar screens to your windows.
Measuring the Solar Screen "Height"
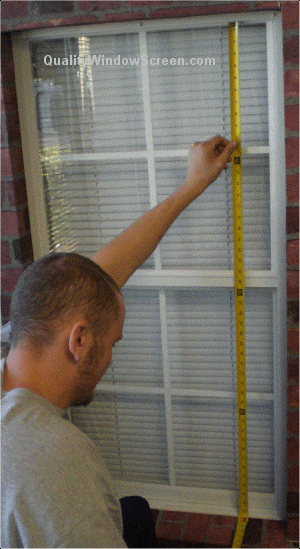
Put the end of a metal measuring tape all the way into the Top U-Channel and hold it as straight down as possible.
IMPORTANT: The hook on the metal tape must be small enough to go all the way into the top U-Channel.
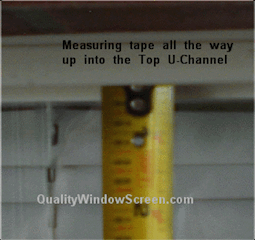
- Make sure the measuring tape is all the way up into into the Top U-Channel.
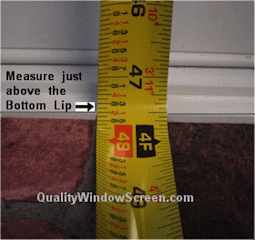
- You should measure to about 1/16" Above of the Top Edge of the Bottom Lip.
- Provide measurements to the nearest 1/16".
- This measurement is your solar screen 'Height'.
IMPORTANT: The concept is that when you insert the solar screen up in the deep Top U-Channel, it has to be short enough to clear the Top Edge of the Bottom Lip, then the springs push the screen down into place behind the lip.
Measuring the Solar Screen "Width"
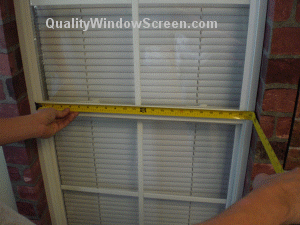 Put the end of a metal measuring tape from left to right and hold it as straight as possible.
IMPORTANT: The left and right should just be a L-Shape or Flat areas. You cannot insert a window screen into U-Shaped Channels on more than two opposing sides.
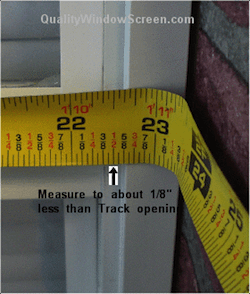
- Place measuring to left side of solar Screen Track opening.
- Measure to the right side and Subtract about 1/8".
- Do not measure the tolerance too tight to allow easy insertion and removal.
- Provide measurements to the nearest 1/16".
- This measurement is your solar screen 'Width'.
Your Solar Screen "Hardware"
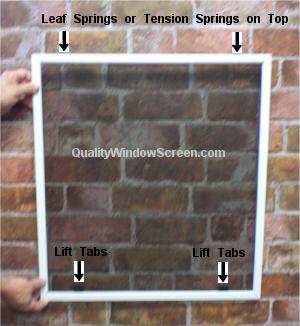 The typical Hardware used on these type of solar screens are:
Leaf Springs or Tension Springs on Top, Lift Tabs on Bottom.
These Hardware Options are found on our Custom Solar Screens order Pages:

Installing your Full Size Solar Screen
 First, insert the top of the solar screen with the springs into the deep top U-Channel enough to compress the springs.
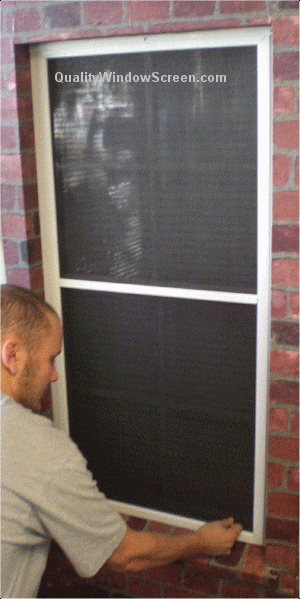 Then slip the bottom of the solar screen behind the Bottom Lip. The springs should push the screen down to hold it in place.
Quality Screen Co. Offers These "How To" Guides to Provide Some Guidance and Tips on Various Activities Related to Measuring, Ordering or Installing Window Screens, Solar Screens, Roll-Away Retractable Window & Door Screens, Porch & Patio Screening Systems and Other Do-It-Yourself Screening Projects. Remember That We Cannot See Your Windows or Doors and That You Are Responsible For Determining Your Own Specific Installation Needs. If the How To Guides Do Not Seem to Describe Your Project or You Do Not Understand Them, Feel Free to Contact us.

Hello, I'm Patrick with Quality Screen Company and today I'm going to show you how to measure for your solar screens using your existing window.
Tracks. The first thing to determine is if your window is equipped with window tracks. We start by looking for the u-shaped channel at the top of the window. The solar screen will slide up into this channel. Now look for the recessed area down the length of either side of the window. This will support the screen laterally. The last thing is to identify the lower lip. This lip will only be about 3/16 of an inch high and, this will keep the screen in place on the bottom.
Now that we've determined that this window has window tracks, let's begin to measure. You want to use the ¾ inch tape measure not a 1 inch tape measure, as the tip on a 1-inch tape measure won't fit inside the u-shaped channel at the top of the window frame. The first measurement I'm going to take is the width. I measure from the recessed area on the left across to the recessed area on the right, making sure to keep the tape measures as straight and level as possible. Also, make sure to measure in multiple locations in order to verify consistency. The actual width of the window is 22 and 5/8 of an inch. We're going to subtract 1/8 of an inch in order to allow for clearance, leaving us with a width measurement of 22 and a half inches.
Now for the height. Start by sliding the tape measure up into the u-shaped channel at the top of the window and measure down to the top of the lower lip. The actual distance from inside the upper u-shaped channel to the top of the lower lip is 71 and 3/8". Now subtract a sixteenth of an inch from that figure to determine the screen measurements. Our final number for the height is 71 and 5/16 of an inch.
Our final measurement is for the position of the crossbar support. Measure from the inside of the lower lip to the center of the crossbar of your window. Our measurement for this is 30 and a half inches. This way you won't see the crossbar support from inside looking out. So our final measurements we're going to submit are 22 and a half inches wide by 71 and 5/16 of an inch tall with a crossbar height of 30 and a half inches. The final thing to decide is if you're going to use leaf springs or tension springs. My preference is the tension spring as they're a little bit more forgiving, but it is your choice.
So that's how you measure for your solar screens on windows with window tracks. Here's the solar screen made to our measurements. Now you'll notice the crossbar going down the center. This goes to the inside. Now let's see if it fits.
And that's all there is to it. It snaps right in.
If you have any questions, please don't hesitate to contact us at QualityWindowScreen.com.